Map creation for Kino (WIP)
This guide will help you set up the enviroment and start creation custom maps for KINO bundle map loader.
Requirements
- Unity editor
2020.3.25f1 - 3D modeling software
Preparation
Unity installation.
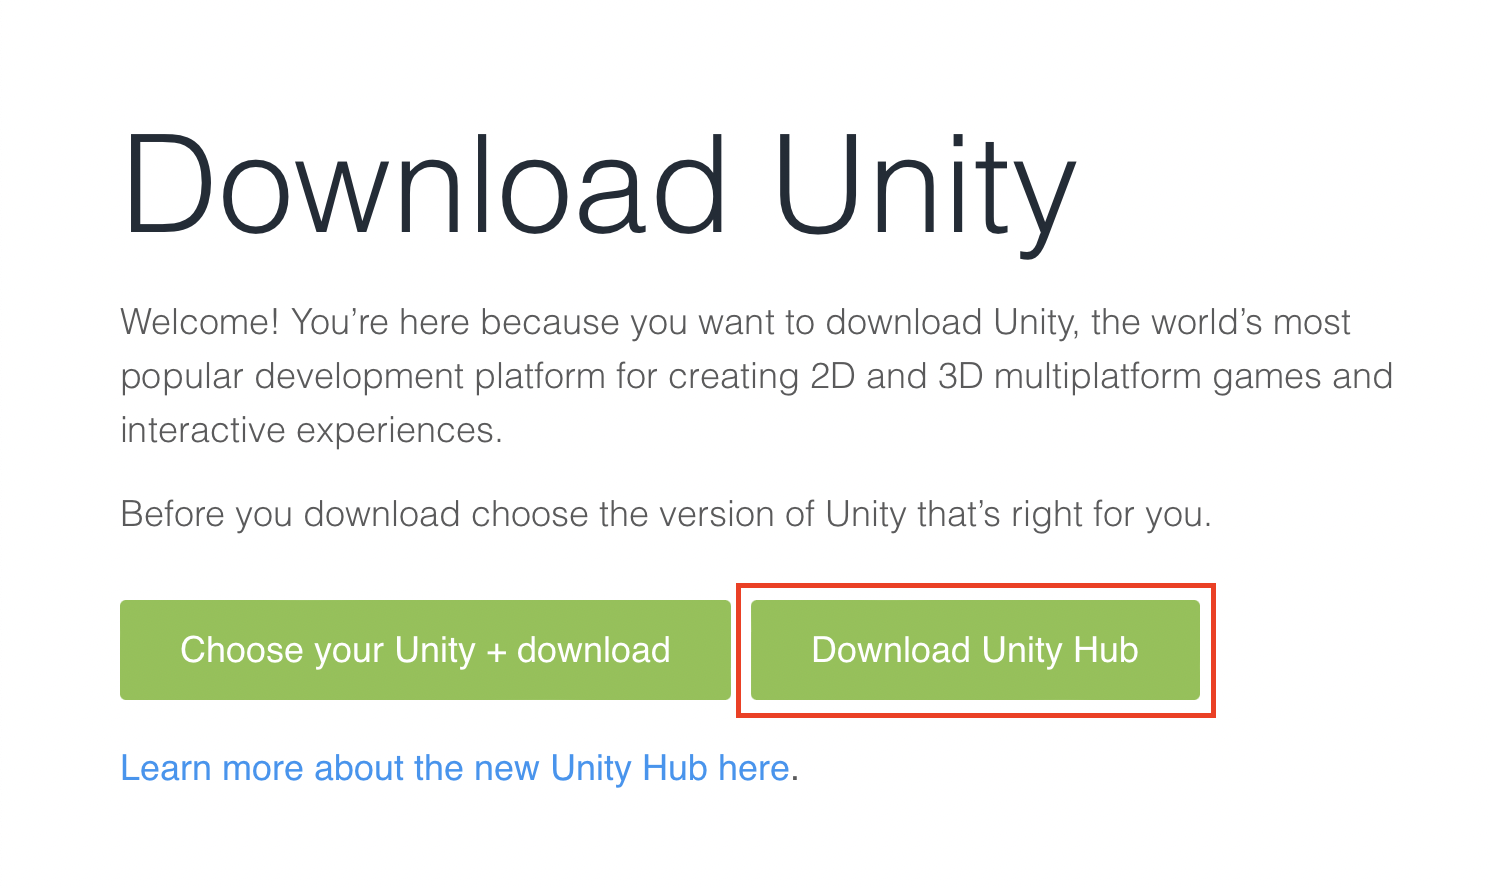
First of all you need to install Unity Hub. You can download it using the following link:
https://unity3d.com/get-unity/download
Then click on the Download Unity Hub button, download and install it.
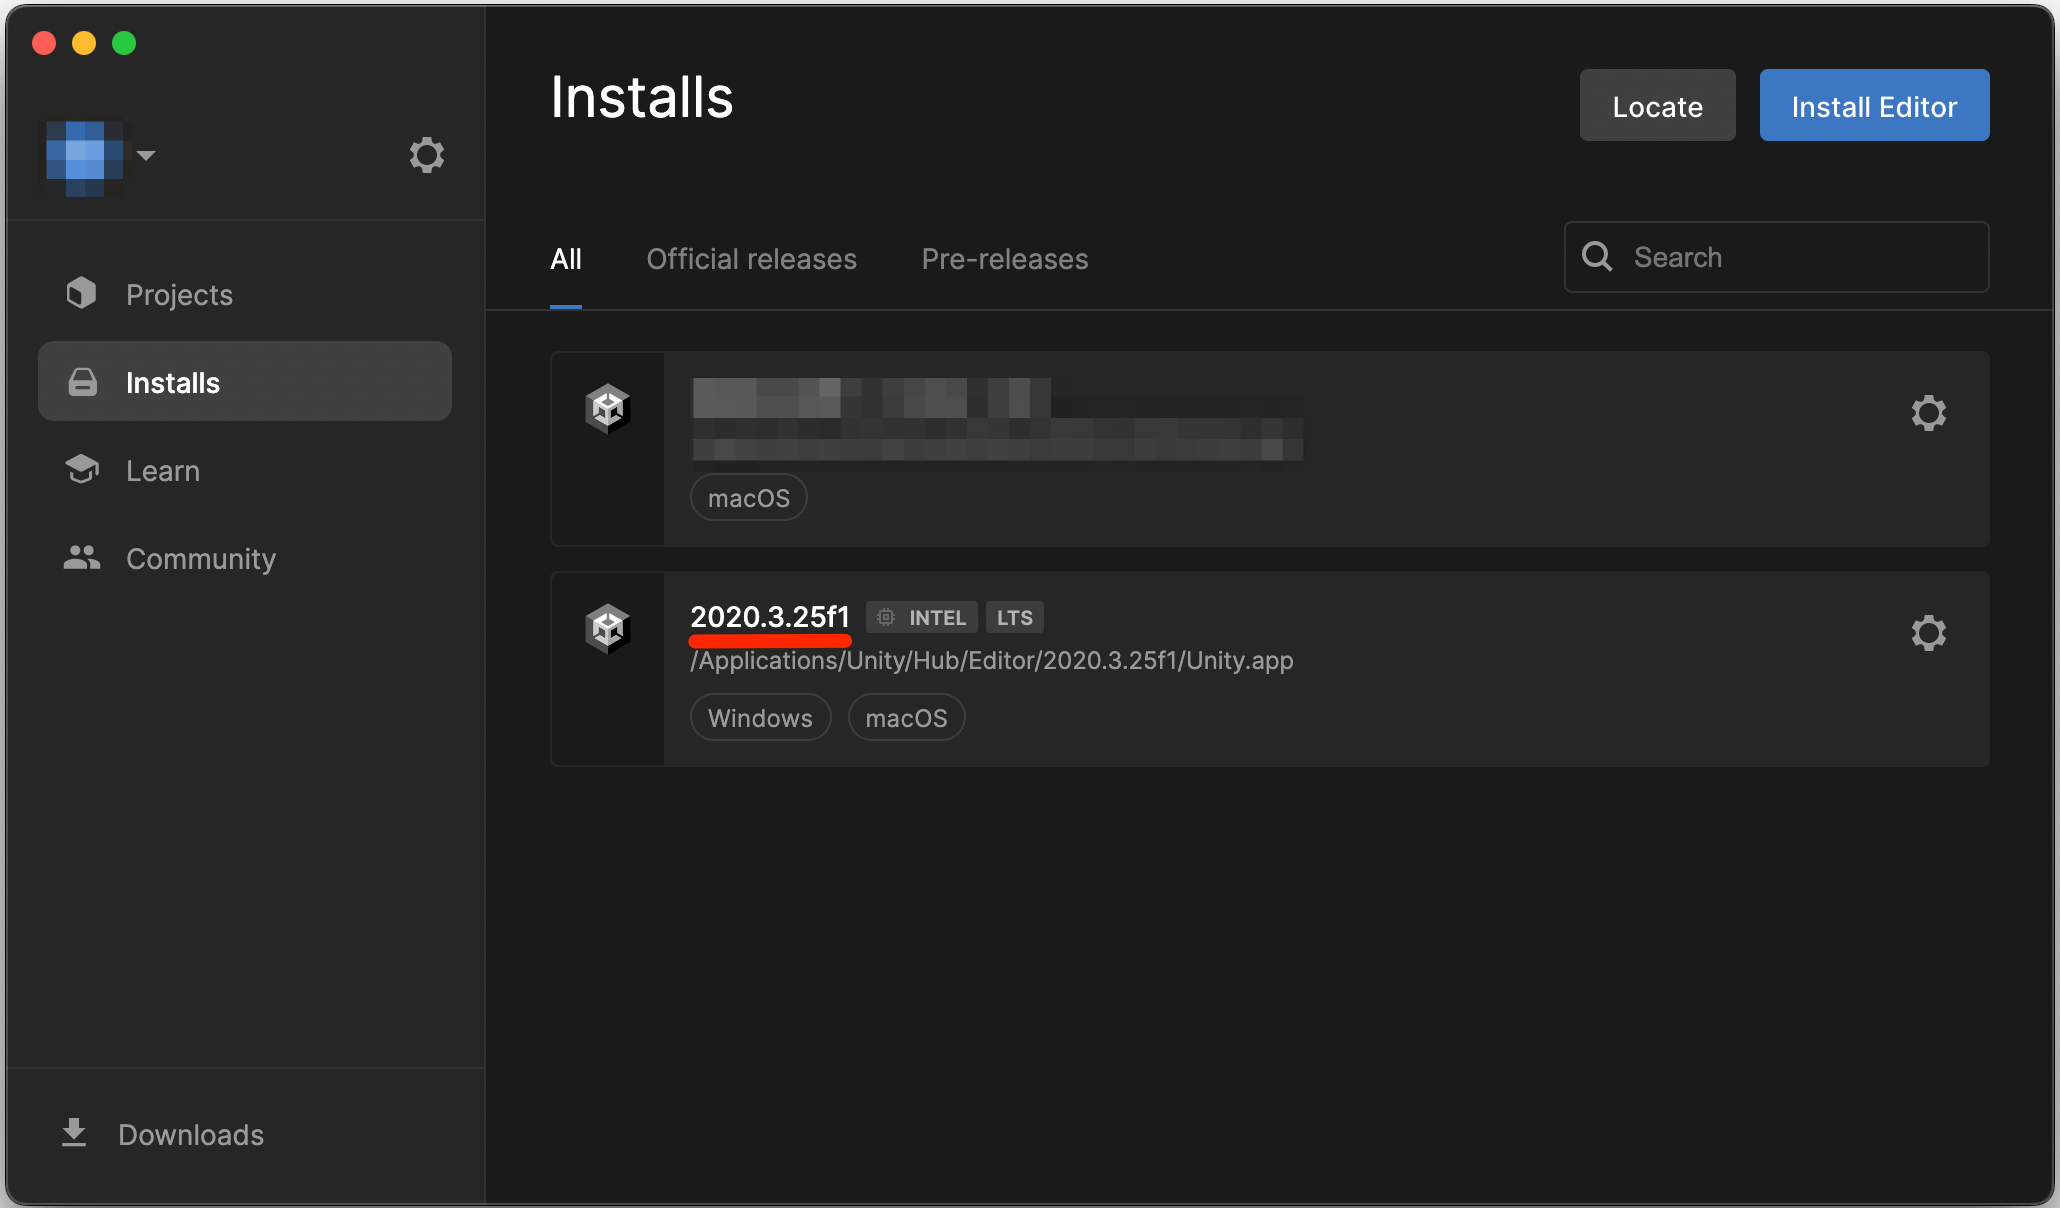
Now let's get to Unity installation. Currently the game uses 2020.3.25f1 version of Unity Editor.
You can download it using the following link:
https://unity3d.com/get-unity/download/archive
Here you need to choose the required version. Currently that is 2020.x

Then find Unity 2020.3.25f1 in the list and click on the Unity Hub button.

After the installation the required editor should appear in the list.
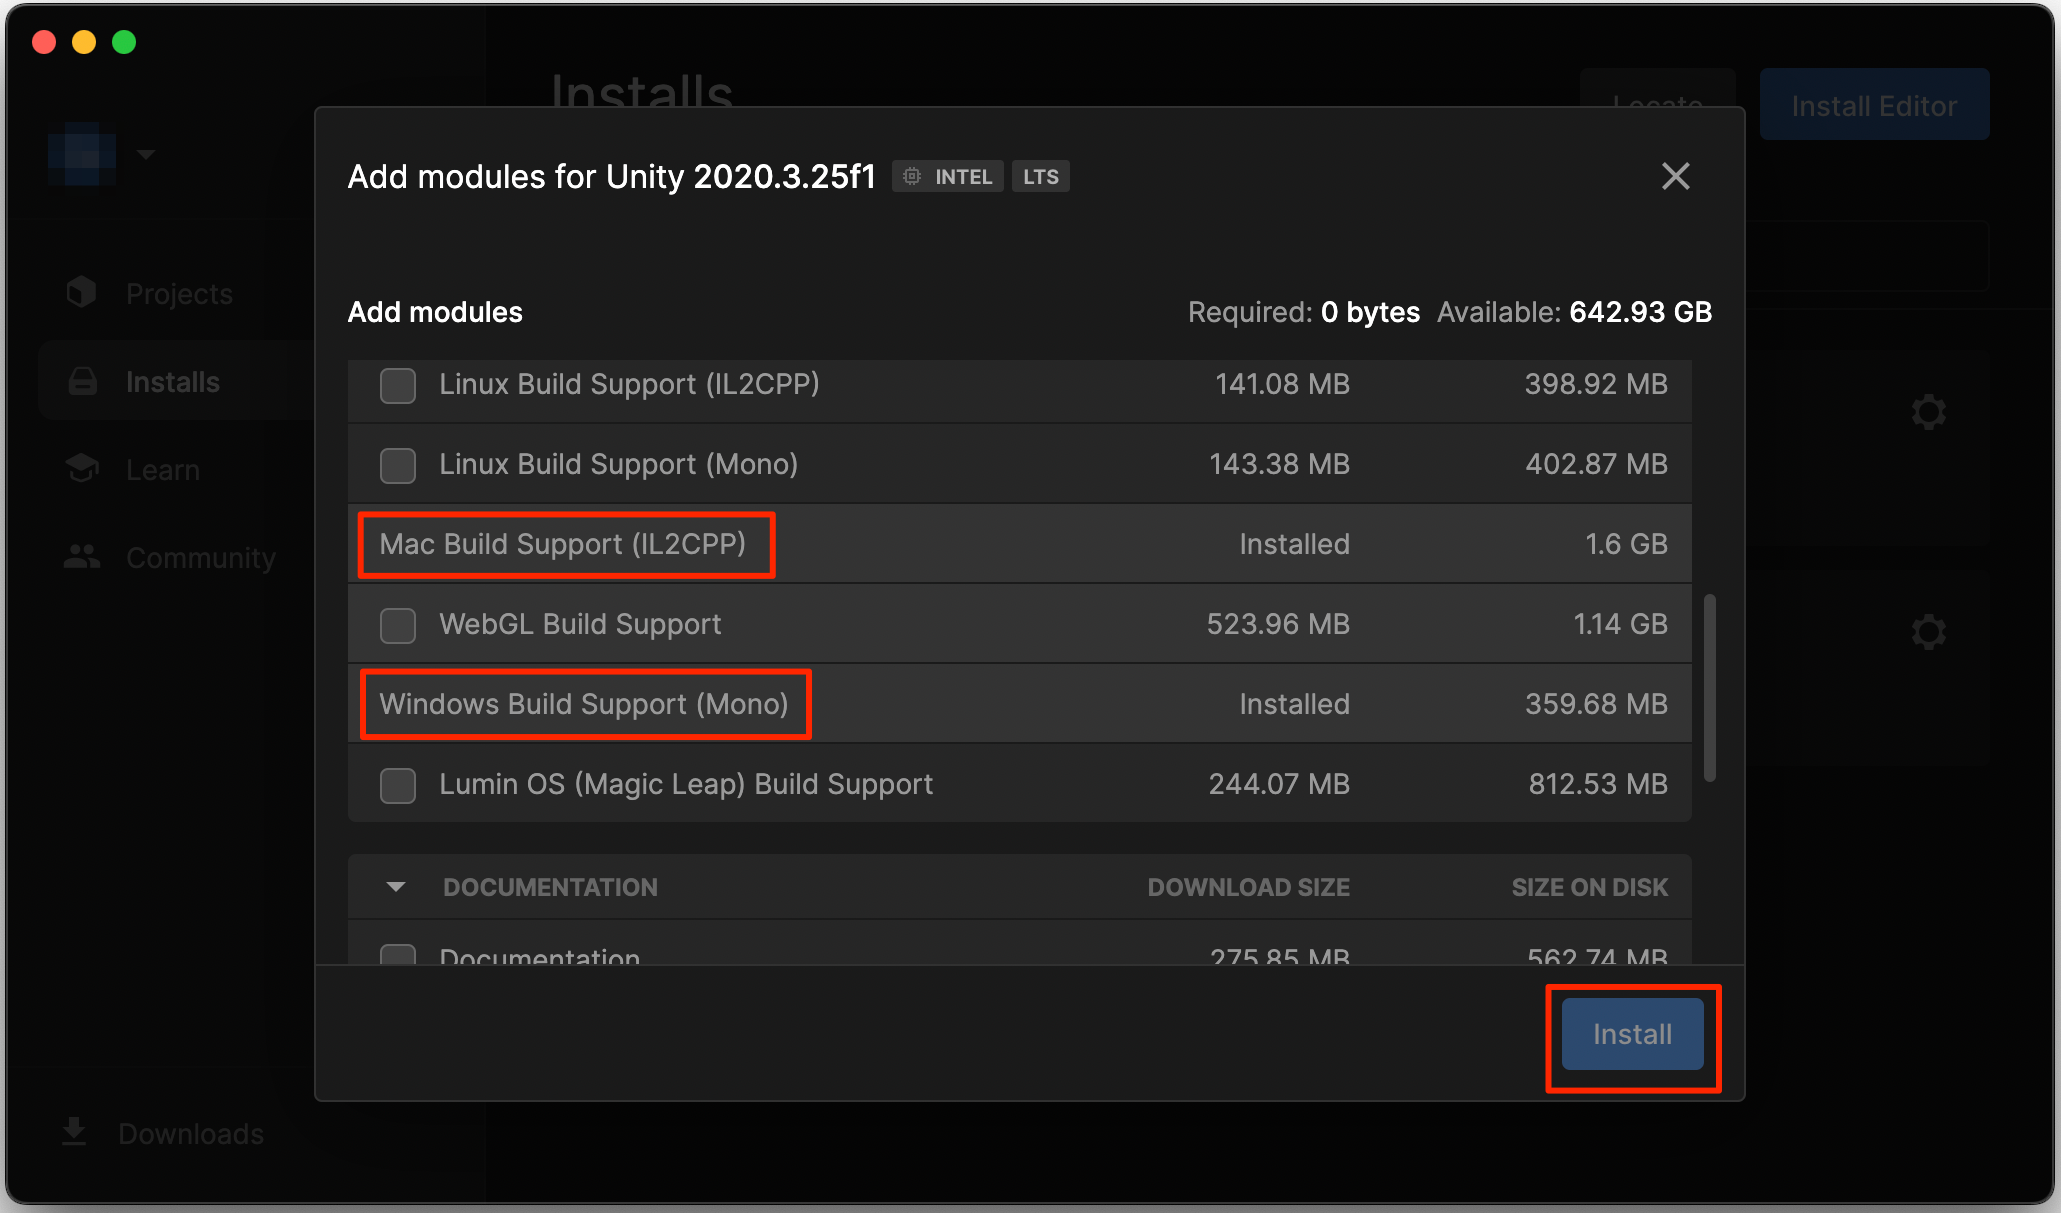
Then you need to install additional modules for building the asset bundle for Windows and optionally for OSX
To do that select the required editor and click on the gear then click on Add modules.
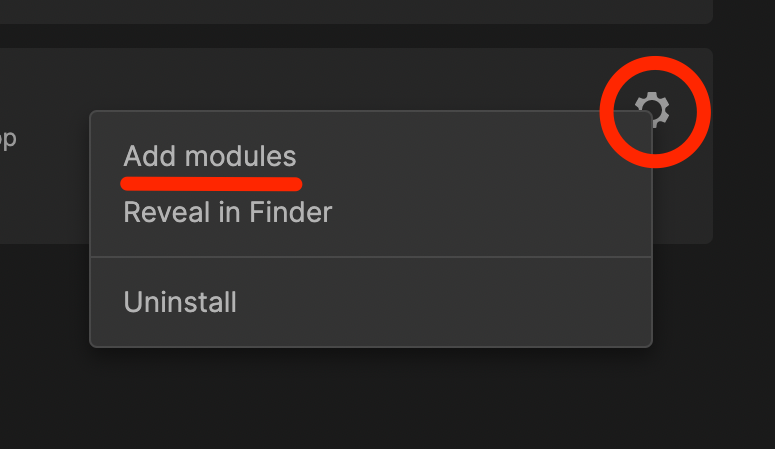
Remove the check mark from Visual Studio, if you don't need it.

Then add the Windows Build Support and optionally Mac Build Support components, then click on Install.
Unity installation is complete!
KinoMap SDK installation
Currently Kino map creation tools are in a form of a Unity project.
You can download the tools using the following link:
https://github.com/trbflxr/kino_map_sdk
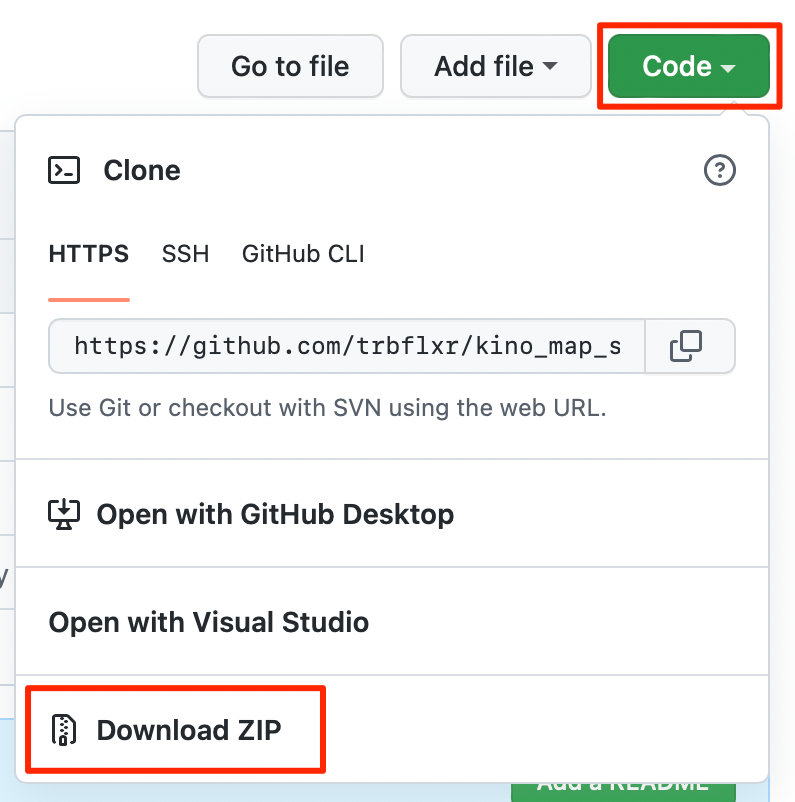
You can download the project using Git or as a .zip file.
- Installation using git git:
git clone https://github.com/trbflxr/kino_map_sdk - Installation using .zip file: click on the Code button, then Download ZIP
Project is downloaded. Now we can get to setting up Unity.
KinoMap SDK project set up
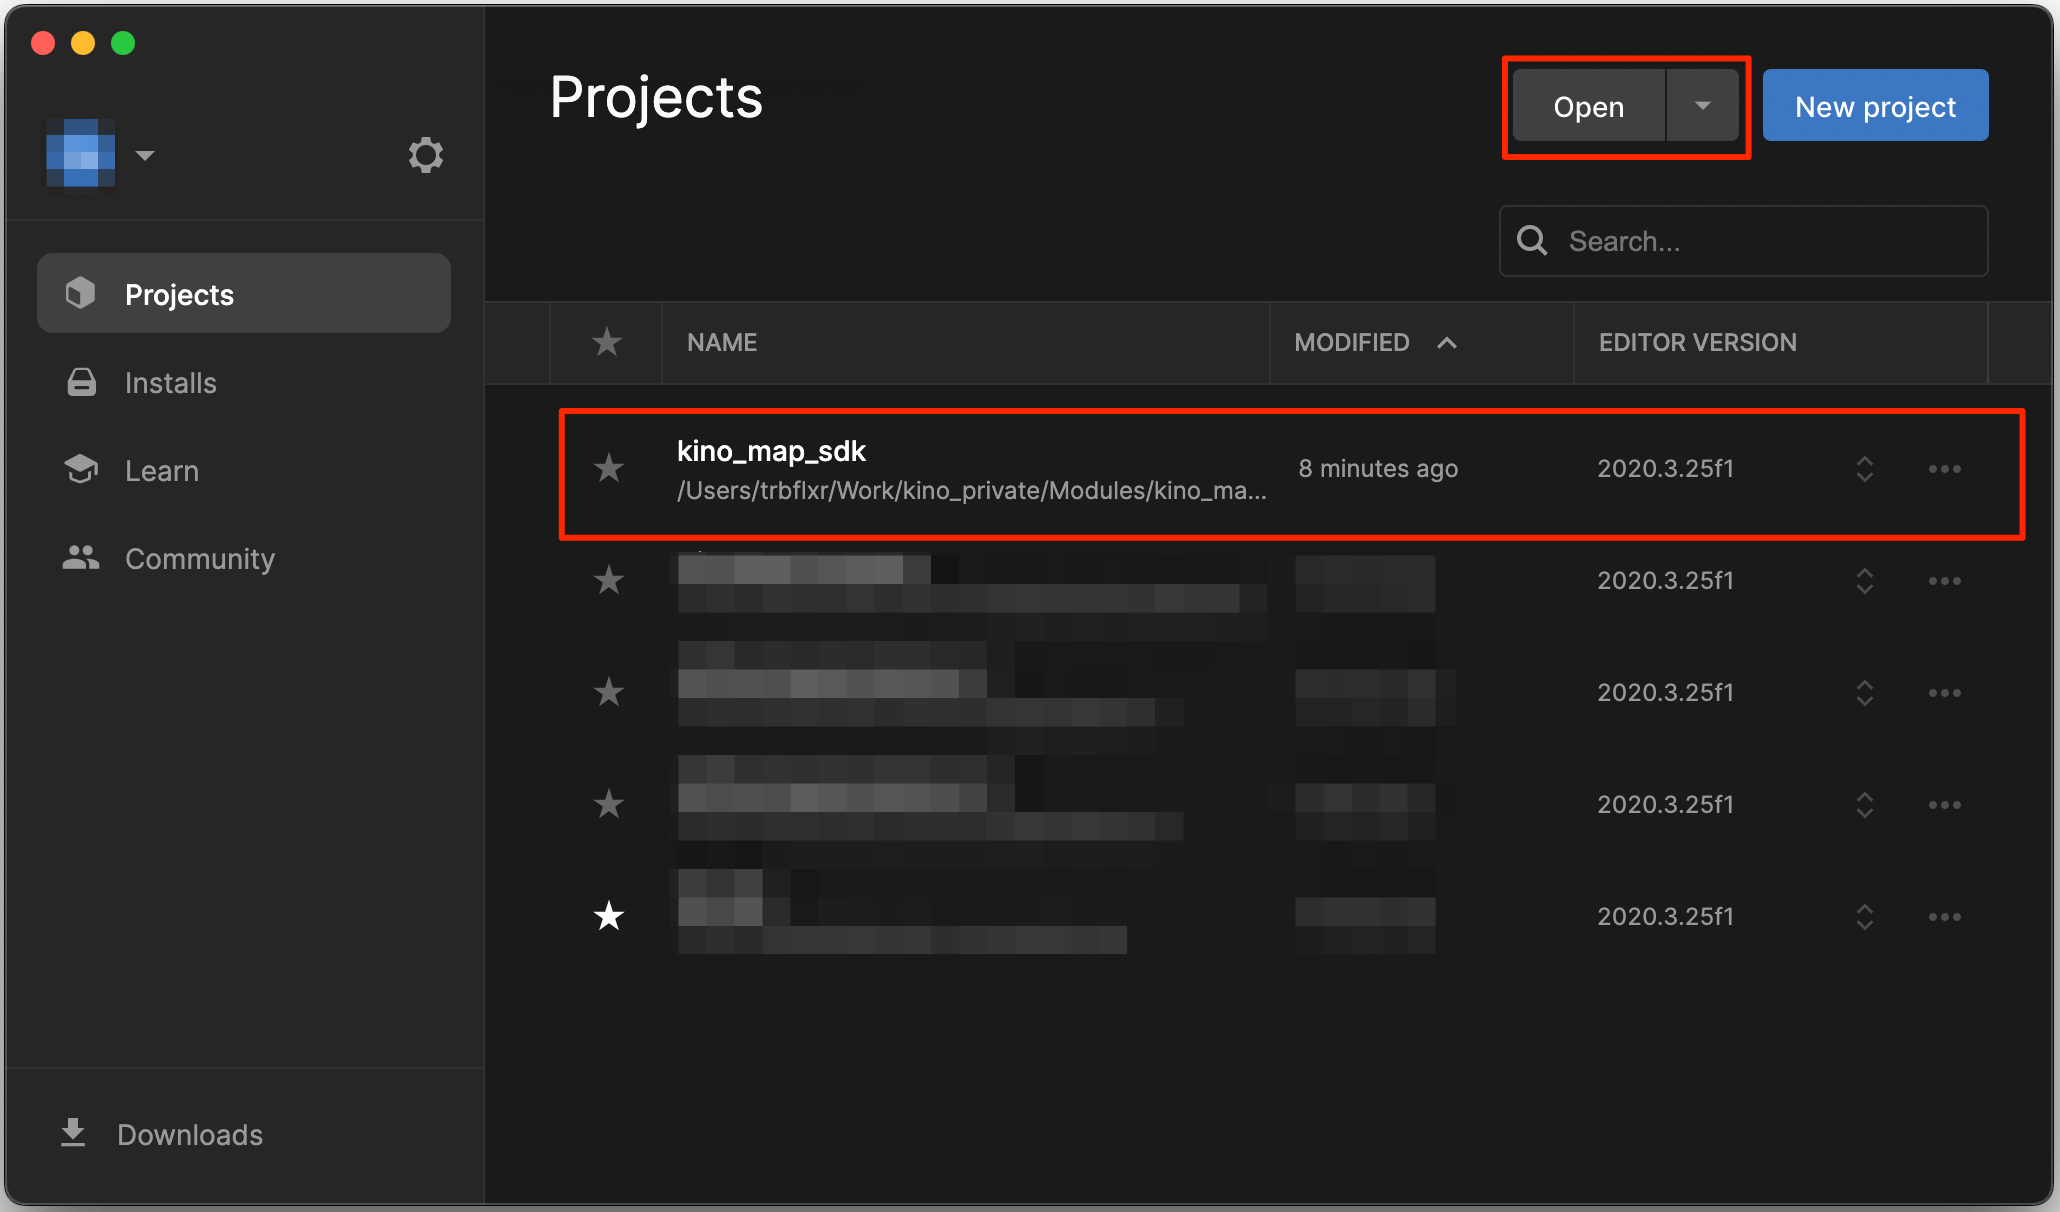
First of all you need to add the project to Unity Hub. To do that open Unity Hub and click on Open button.
In the explorer state the path to kino_map_sdk.
As a result the project will appear in the list. Double-click on it to start up the editor.
Preparation for map creation
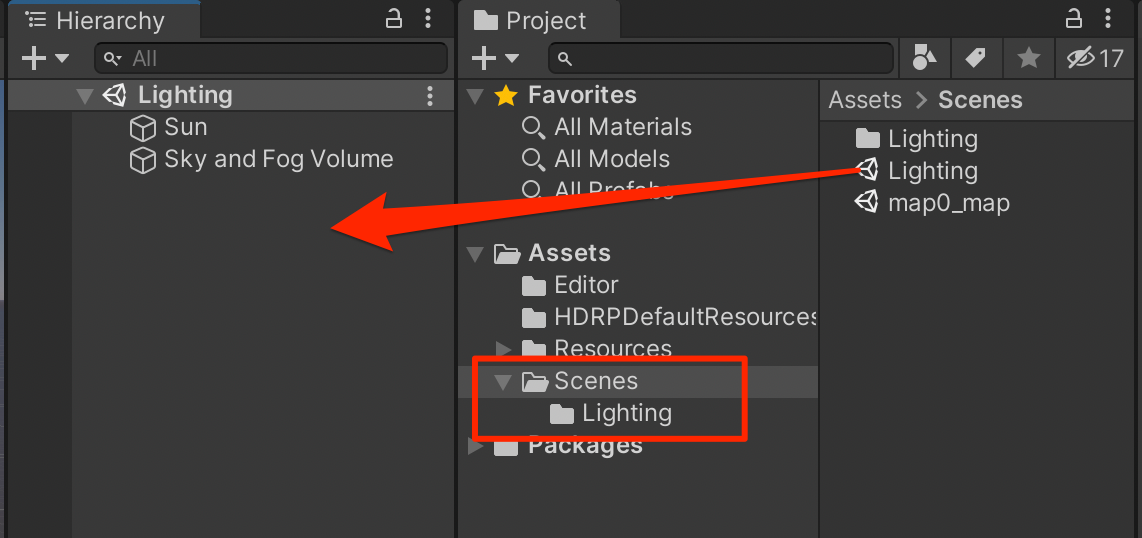
Lighting in the editor
The project has a Lighting scene in the folder Assets/Scenes. Drag and drop it to the Hierarchy tab, in order for the editor lighting to work.
This is an optional step, to have a rough understanding on how the lighting on the map is gonna look in the game.
You can set up this scene however you like. It will only work in the editor and won't show up in the game.
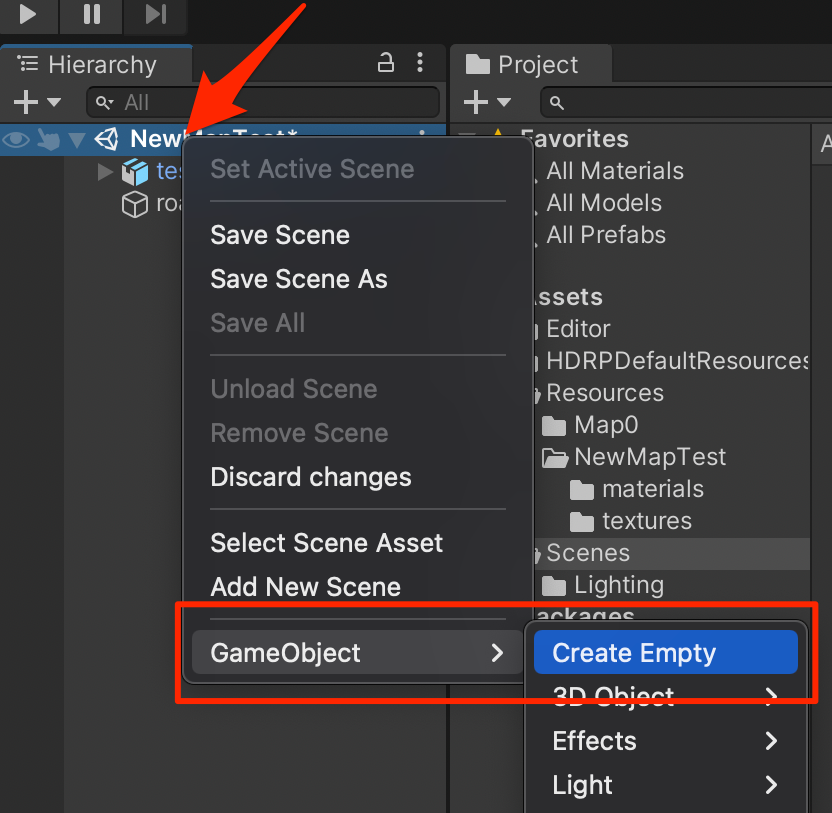
Map scene creation
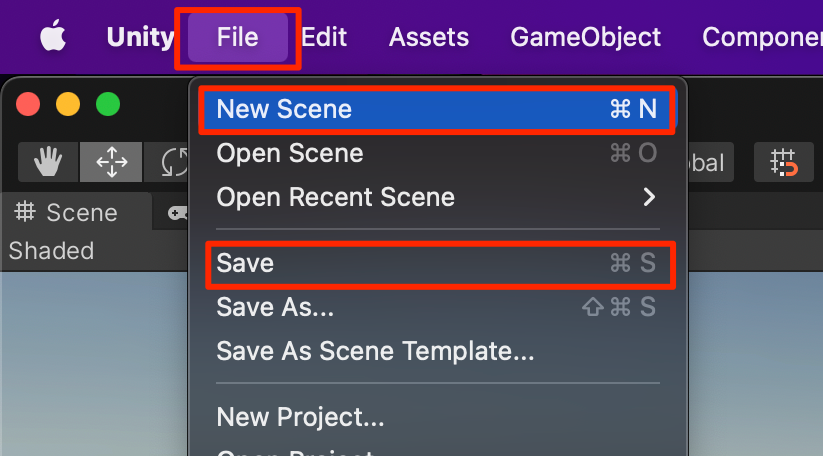
To create a new scene click on the File and then click on New Scene.
Or use Ctrl + N shortcut for Windows and Command + N for OSX.
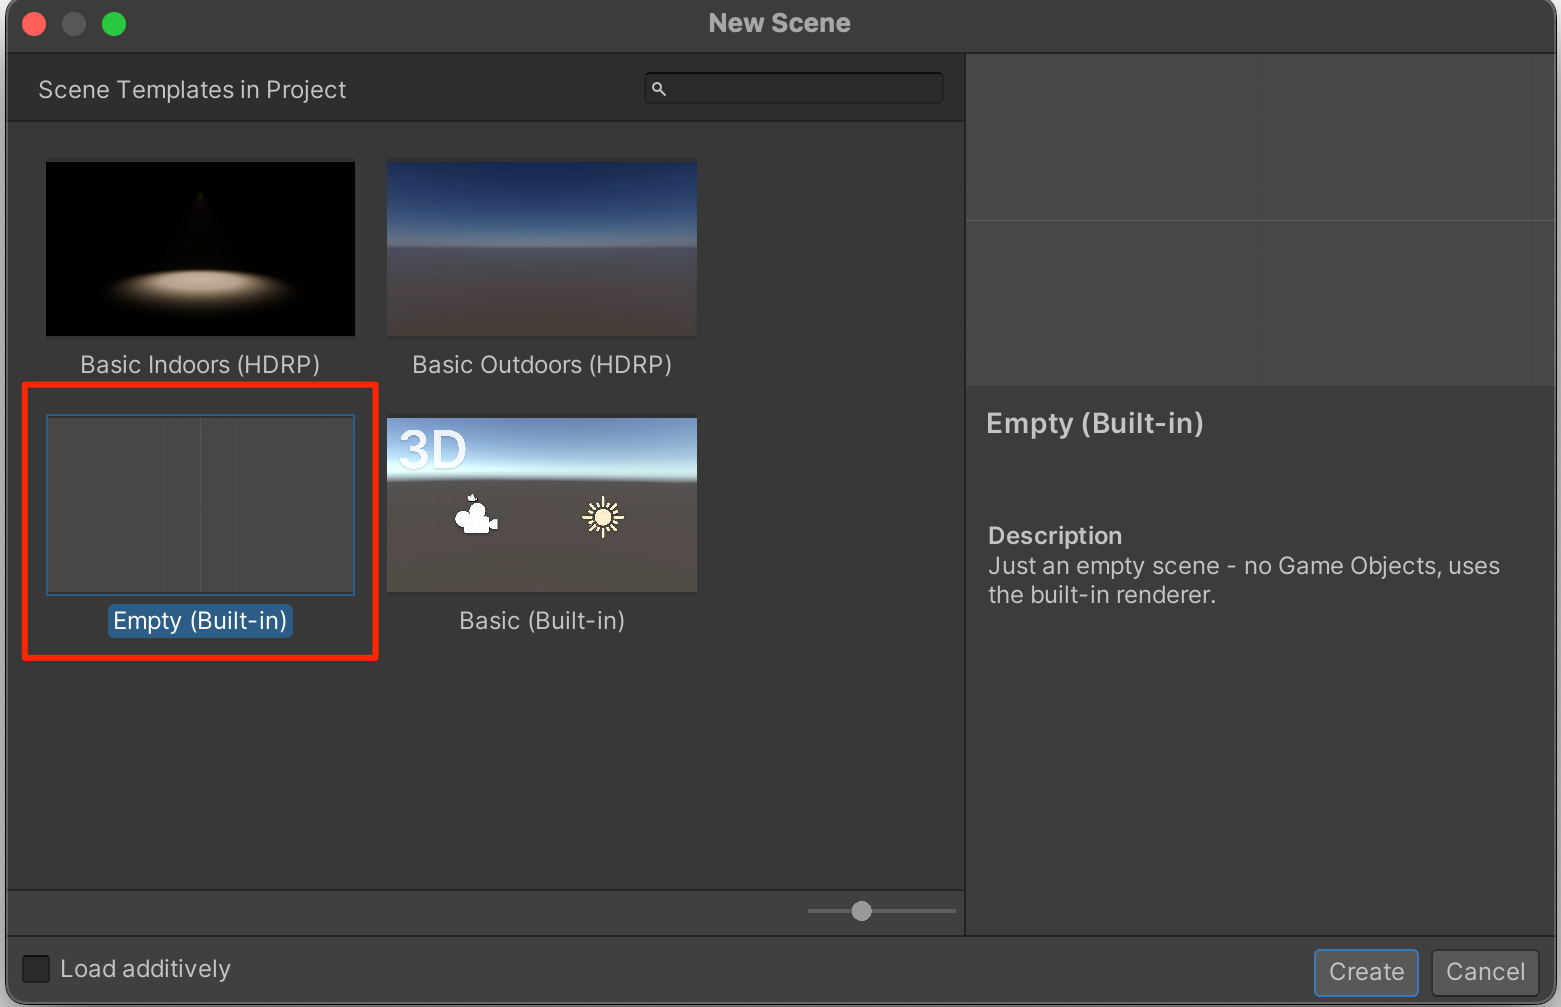
Then you need to select an emtpy scene Empty (Built-in) and press Create
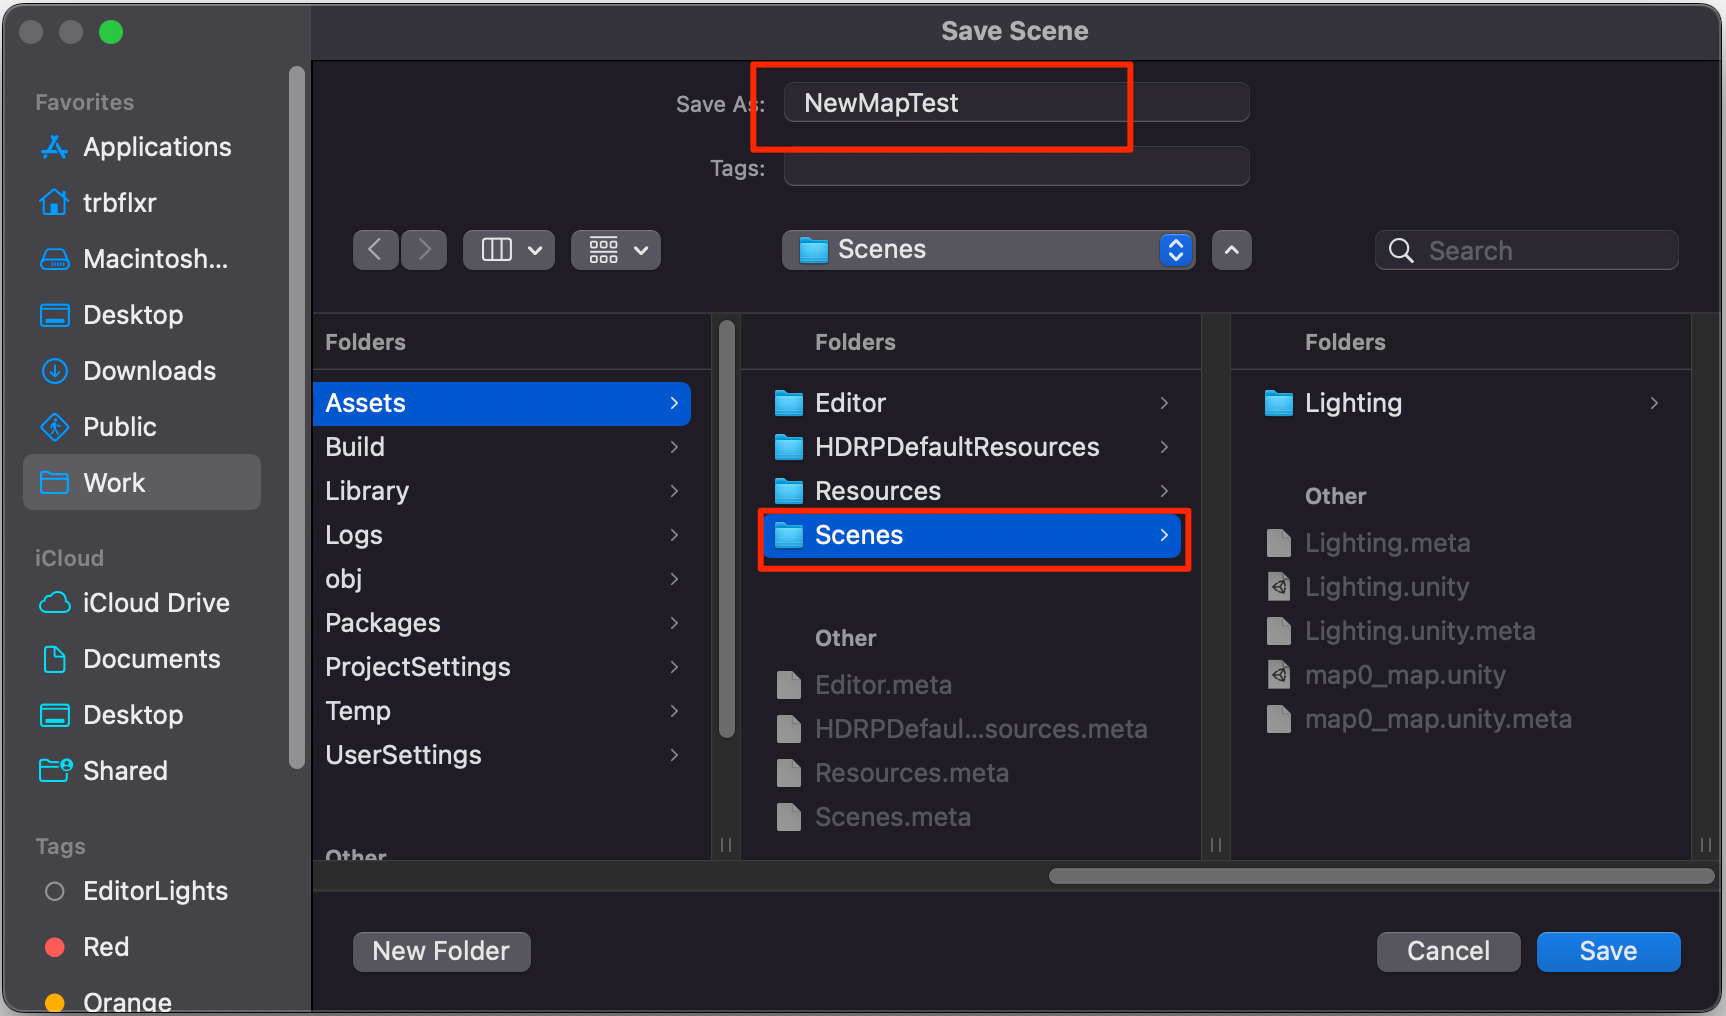
Empty scene is created, now save it using File and then Save.
Or use Ctrl + S shortcut for Windows and Command + S for OSX.
We saved the scene in the folder Assets/Scenes, however you can save it in any folder in the project that works for you.
Adding the map content
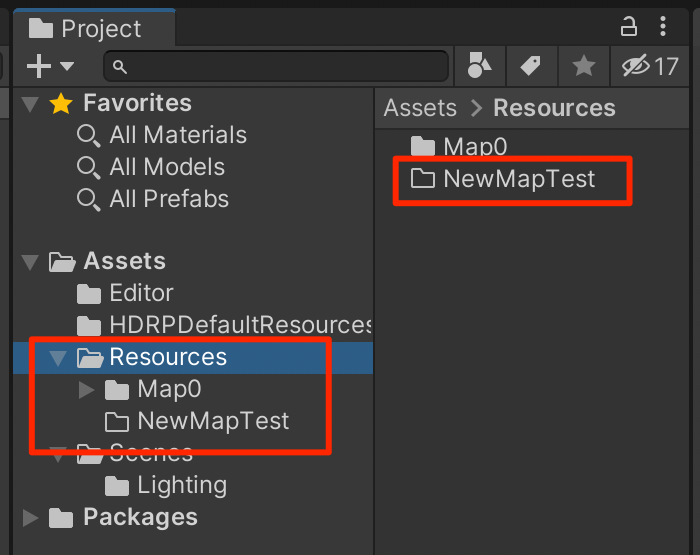
It is implied that the project will be used to create multiple maps within the same project instead of creating separate projects for every map. So create the Assets/Resources folder with your map's name, that's going to store all the assets for it.
This step is optional and is needed for a better project structure and won't affect the final product.
In the example we created the folder NewMapTest.
Let's start filling it up with assets.
From this point on you can add any assets to the projects and use it across all the maps you're making.
Let's look at the example of importing am .fbx model and textures for it. Transfer all the needed files to the map's folder.
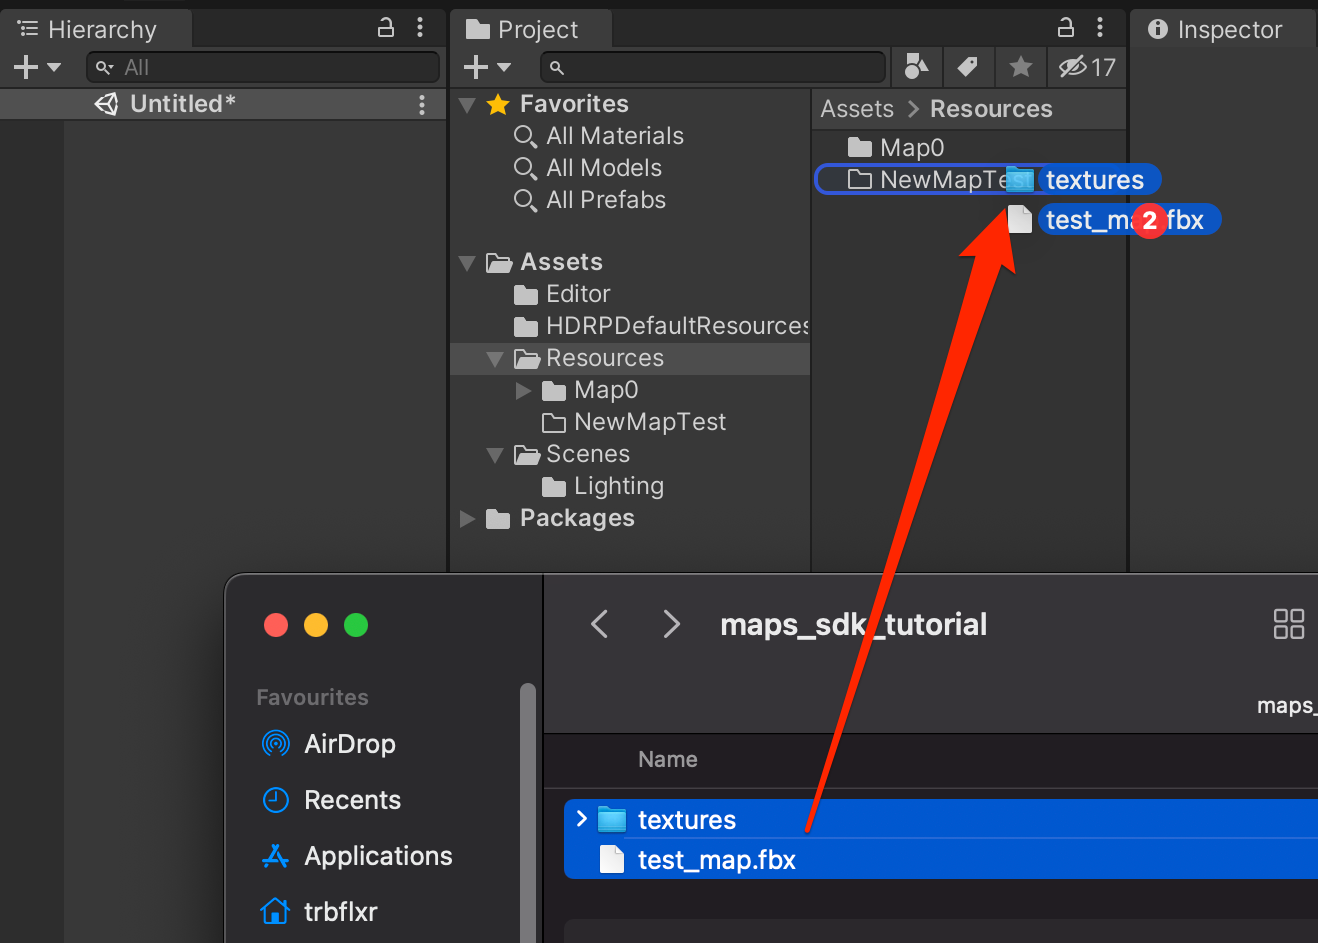
Now drag and drop the model to the scene.

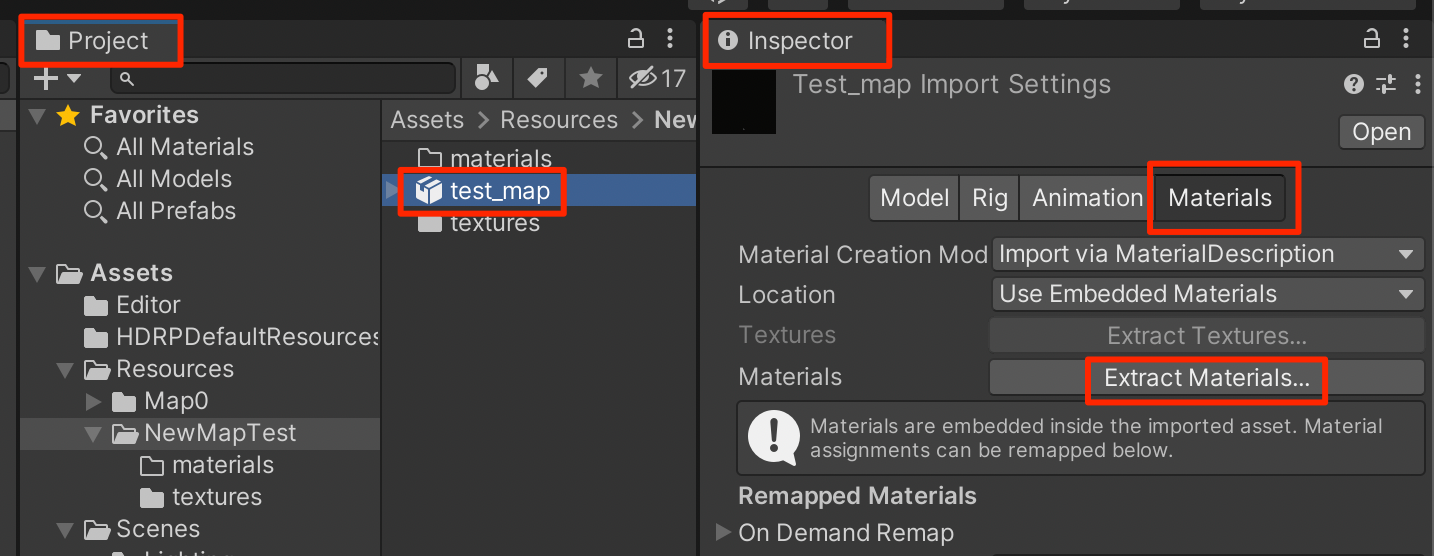
At this point the model is most likely pink and has no material.
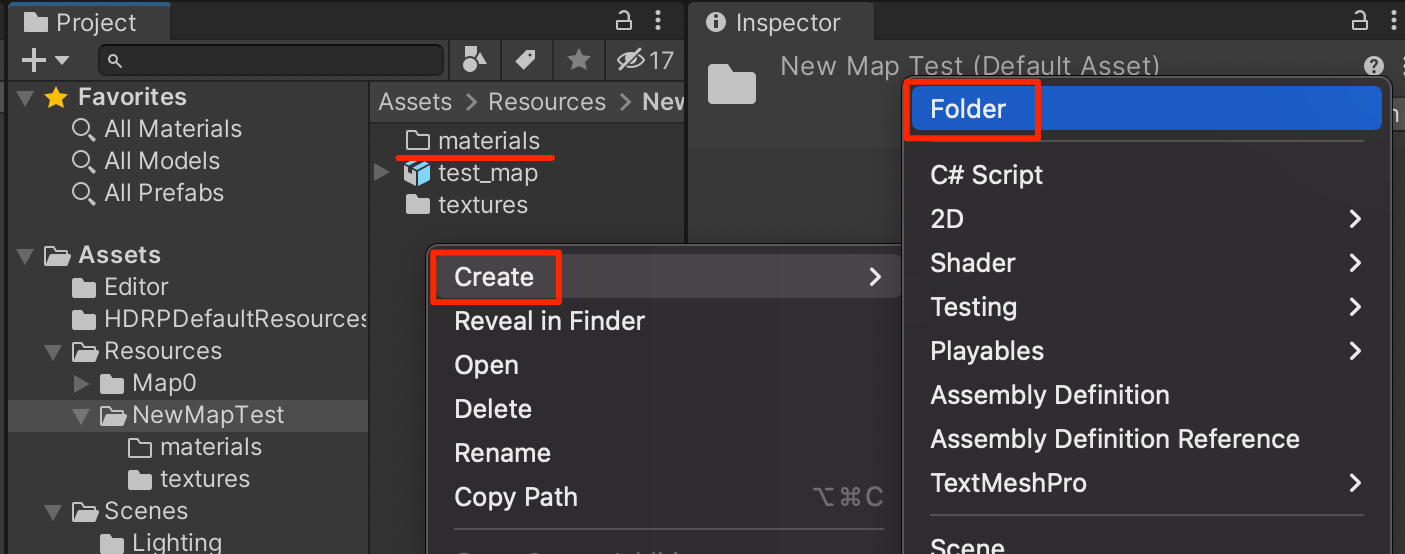
Create the folder for materials. We created it inside NewTestMap and named it materials.
Next step is to extract the materials. To do that select the model inside the Project tab, then go to the Inspector tab, select Materials and click on Extract Materials.... Then extract the materials to the folder created earlier.
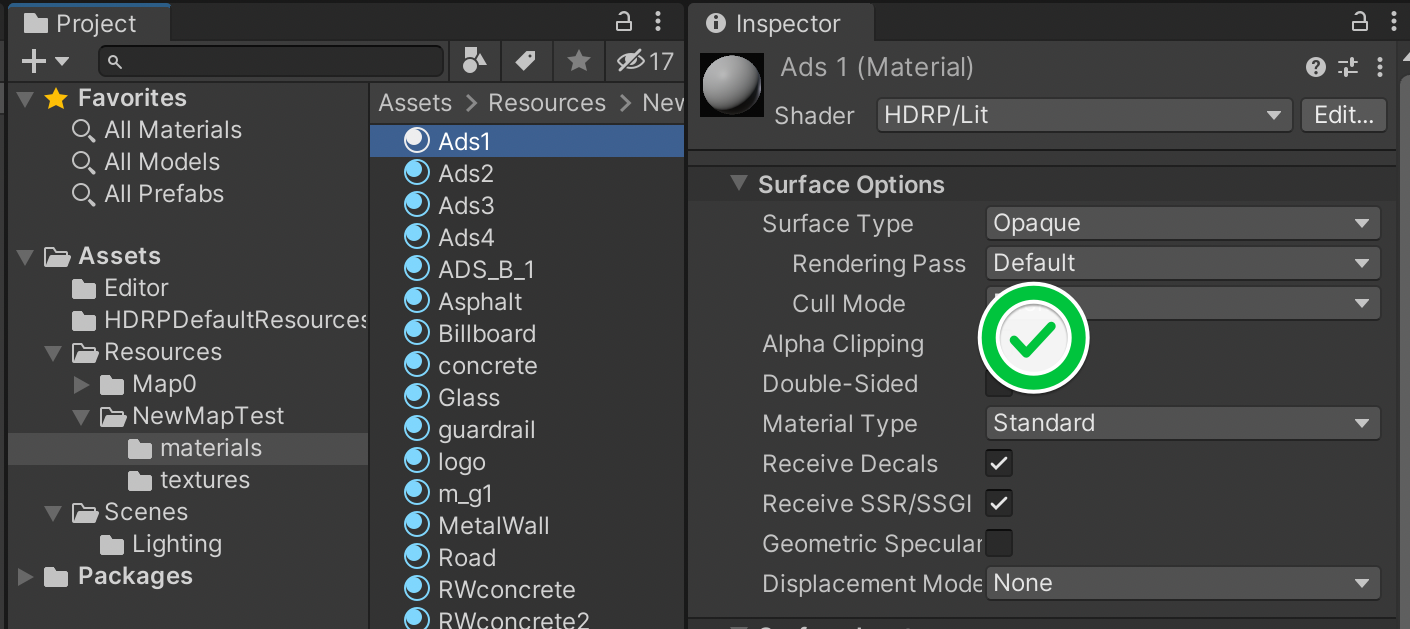
Now the model should appear correctly and we can get to adjusting materials settings if needed.
Important notes regarding the map structure
Map for Kino should have any any light sources that belong to the Directional Light type, and should have any Volume components. Also they shouldn't have any cameras on them.
Setting up the map structure
Surfaces
Currently Kino support the following types of surfaces:
roadgrassdirtgravelsandicesnowkerb
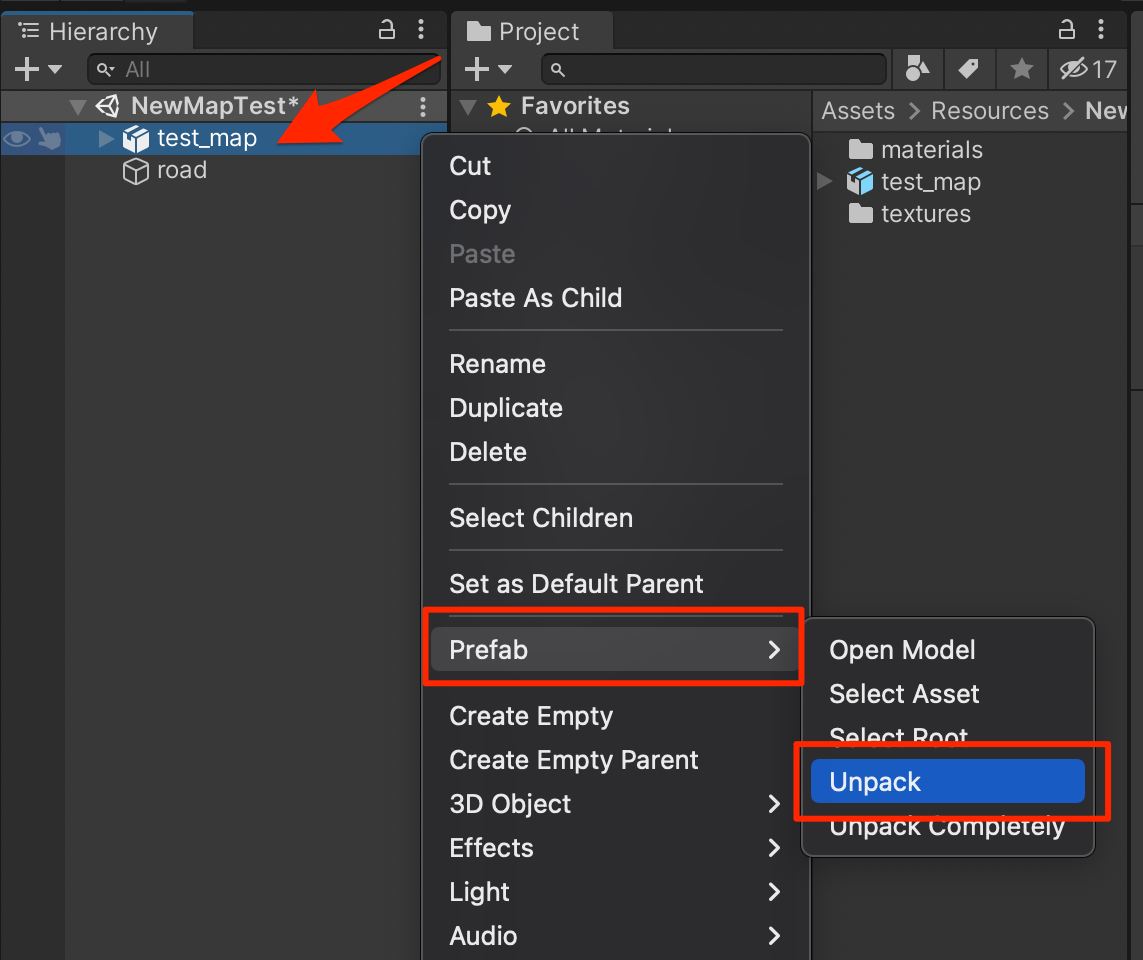
Unpacking the prefab
First you need to unpack the prefab. To do that right click on the prefab then select Prefab -> Unpack.
Map structure
Let's get to setting up the map's structure.
This part is very easy. Road surfaces go to the road object, grass in the grass object and so on.
Add the object to the scene and name it surfaces.
In the example we created Empty objects road and grass. Then we moved all the surfaces that the game should treat as road and as grass.
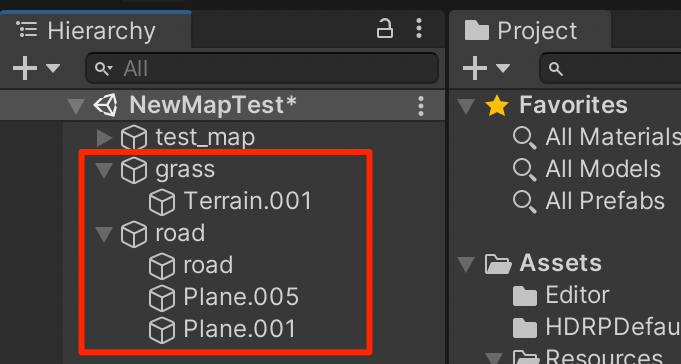
Objects of the other types are structured using the same principle.
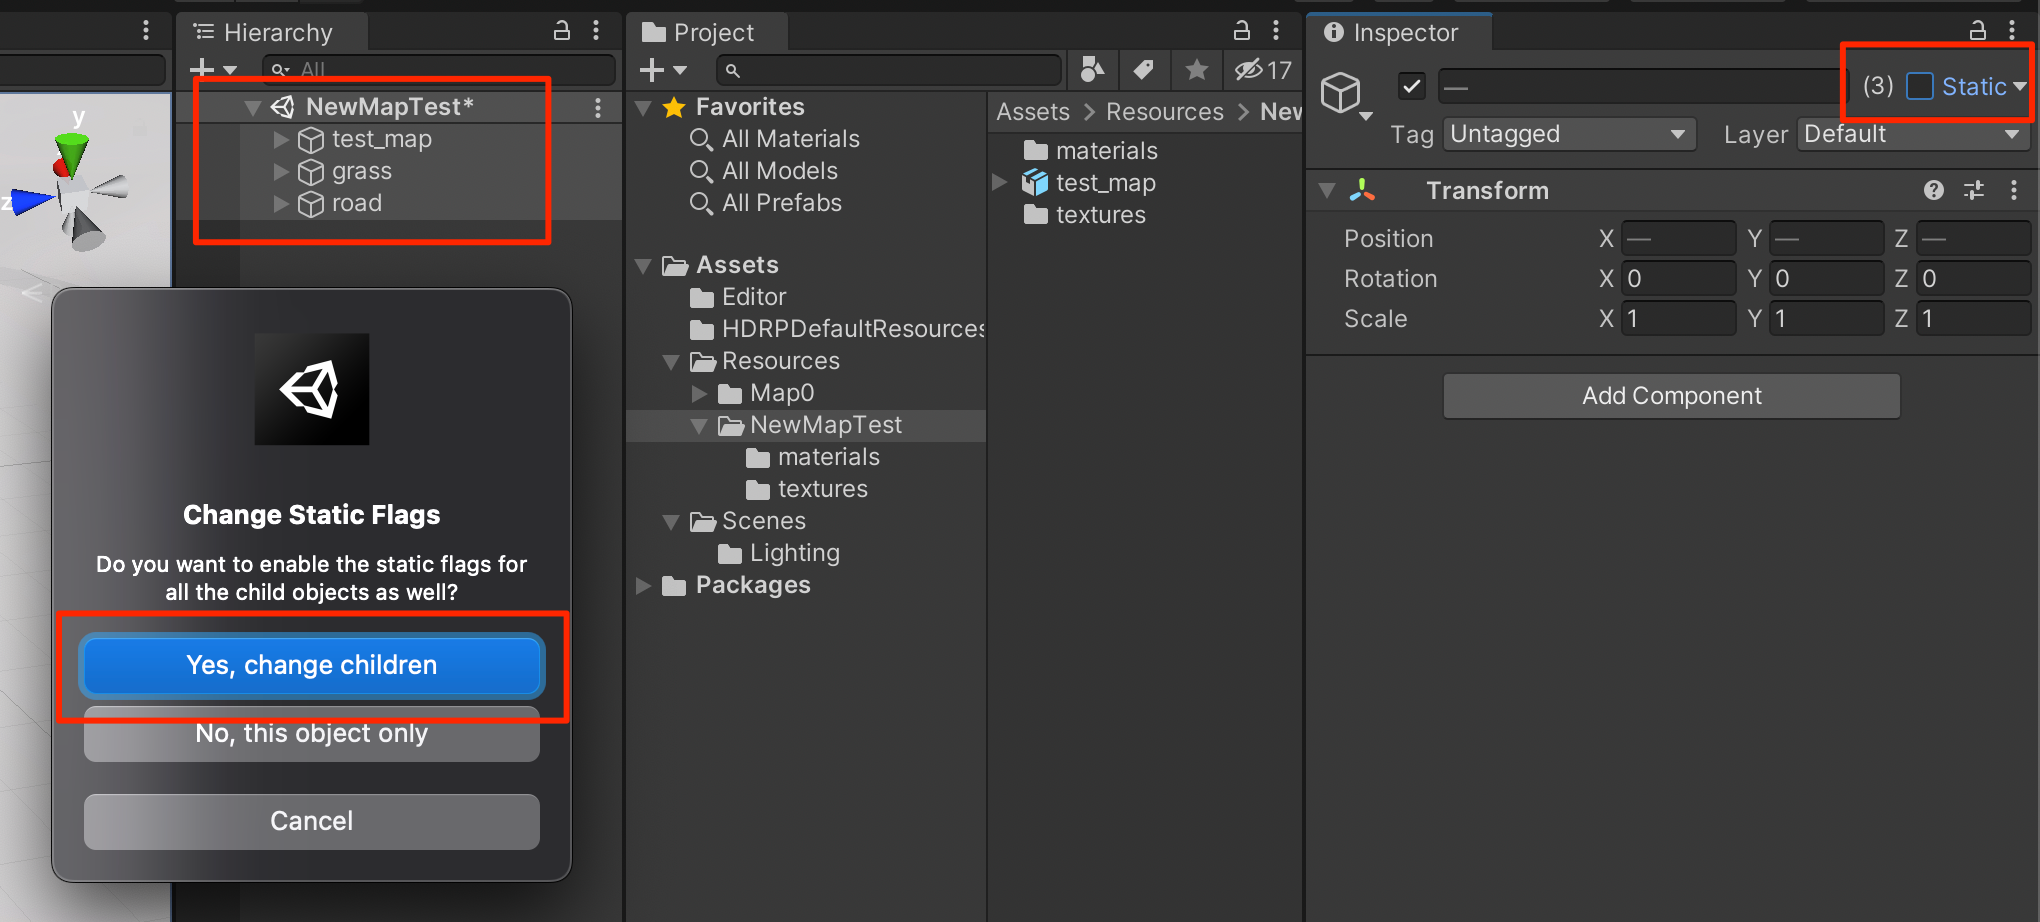
Optimization
Then we need to select all the static objects, for an example roads, poles, building and give them the Static flag.
Colliders
To process the collisions map should have the colliders set up.
Select all objects, that should have a collider and add the Mesh Collider component to them.
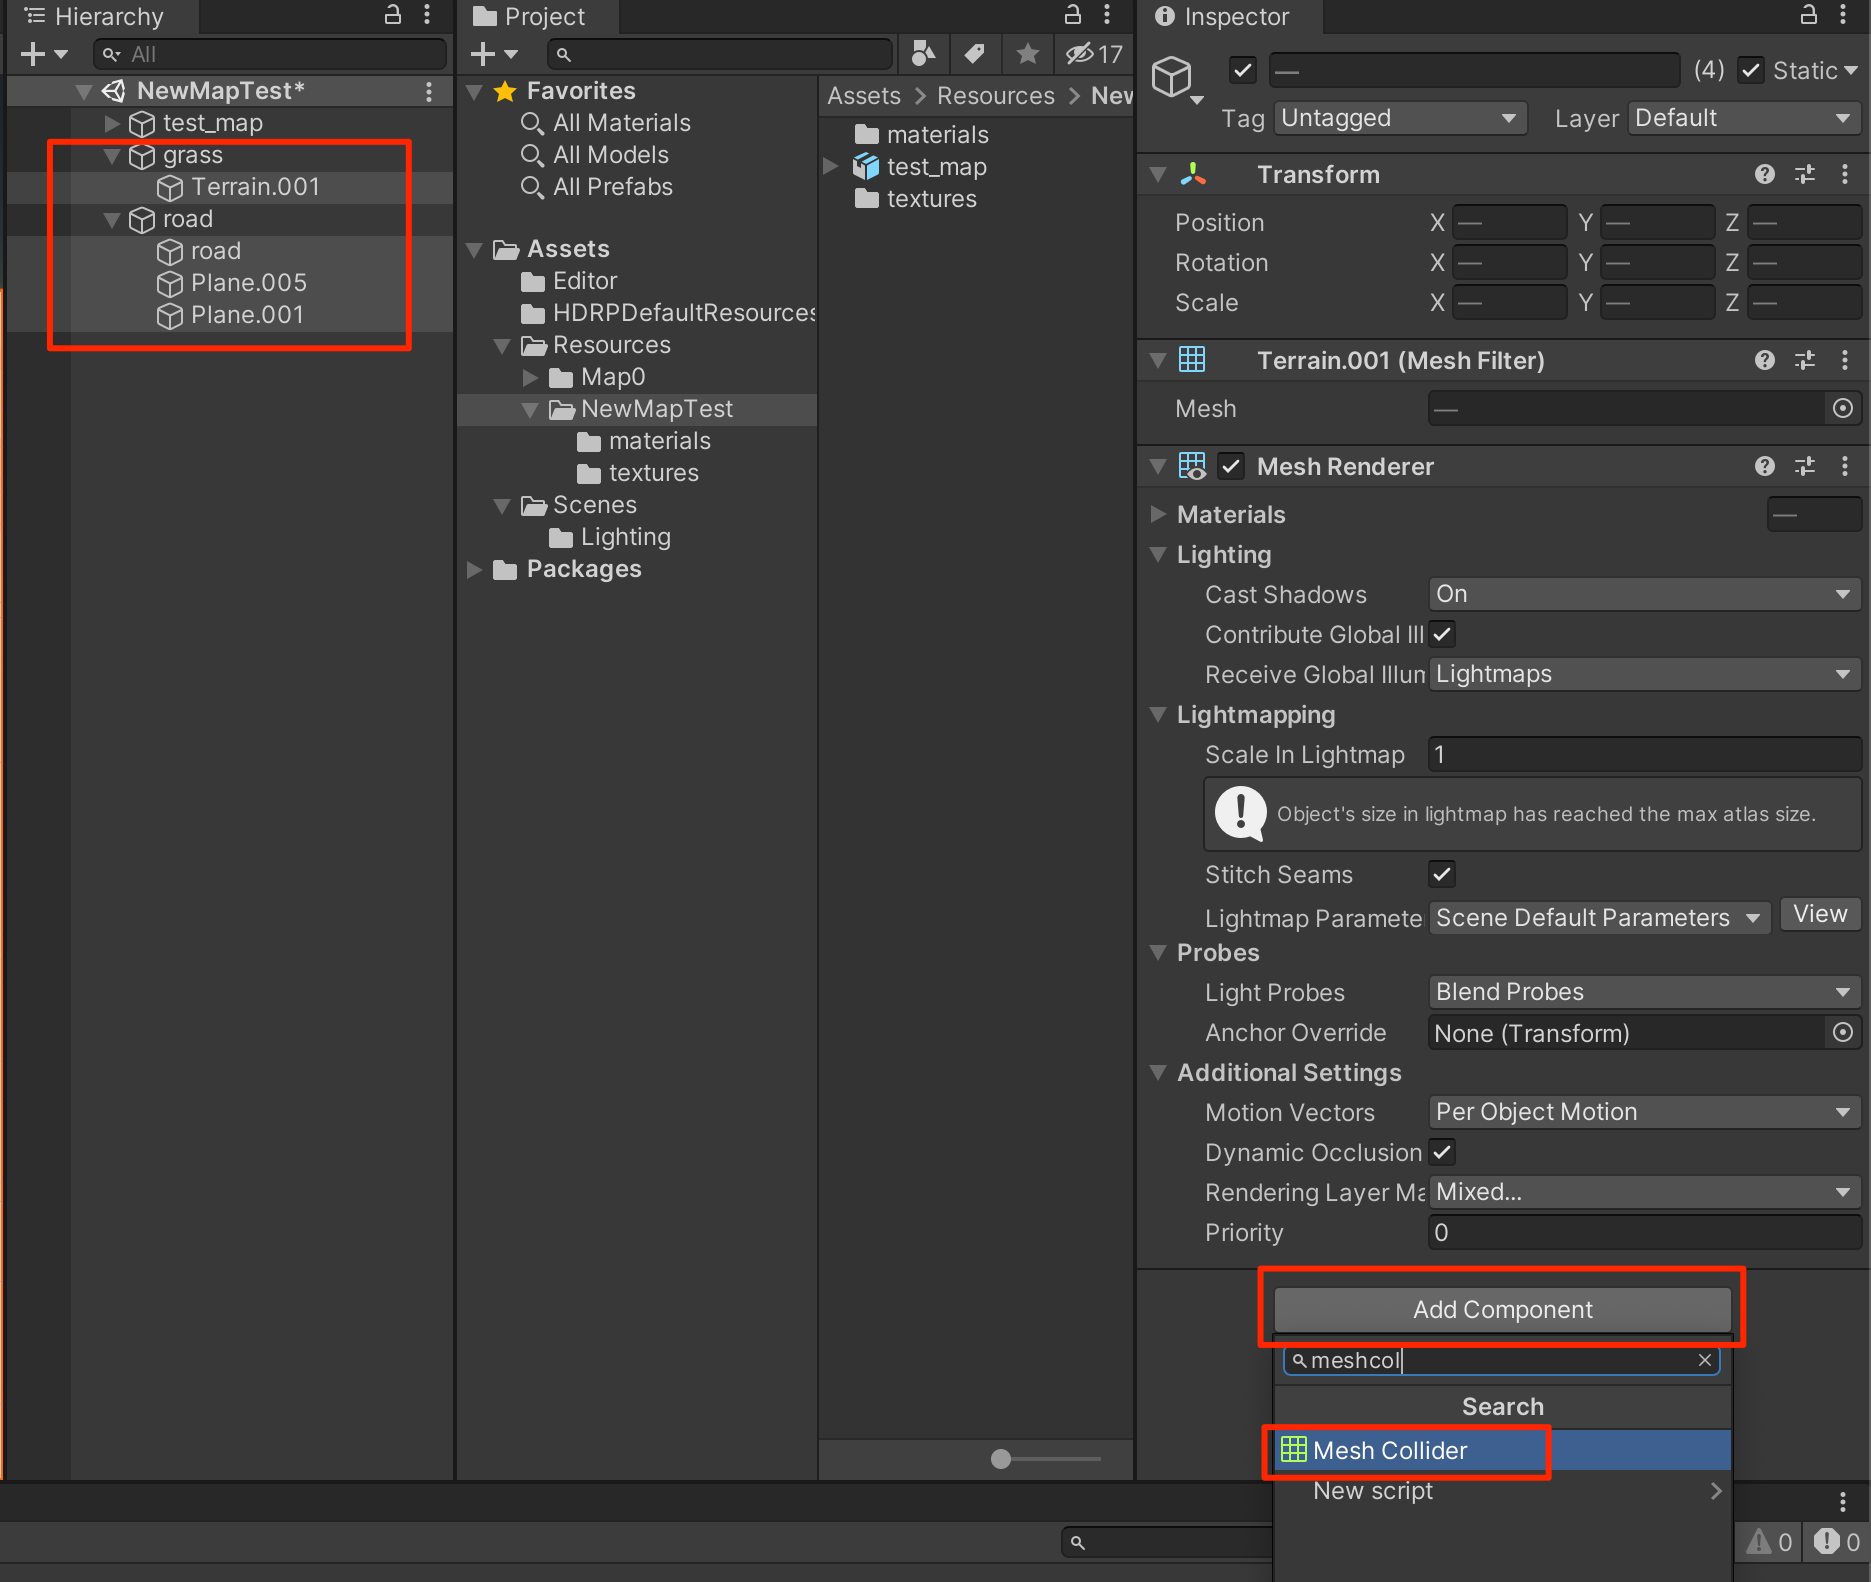
In the examples we only gave colliders to road and grass. In the process of map creation, colliders should be given to all the objects that should have a collision.
Spawn points
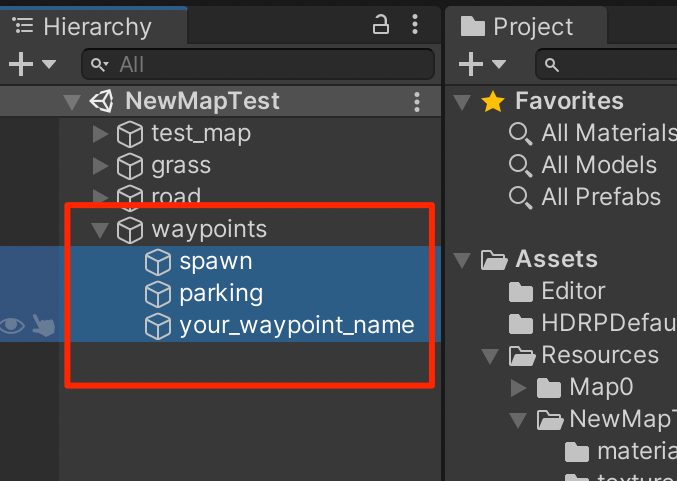
To add spawn points you need to create Empty objects named waypoints In the scene's hierarchy. Then add the spawn points there. The first point in the list is gonna be spawn points. All of these points will be accessible from the Waypoints tab of the mod.
Rigid bodies
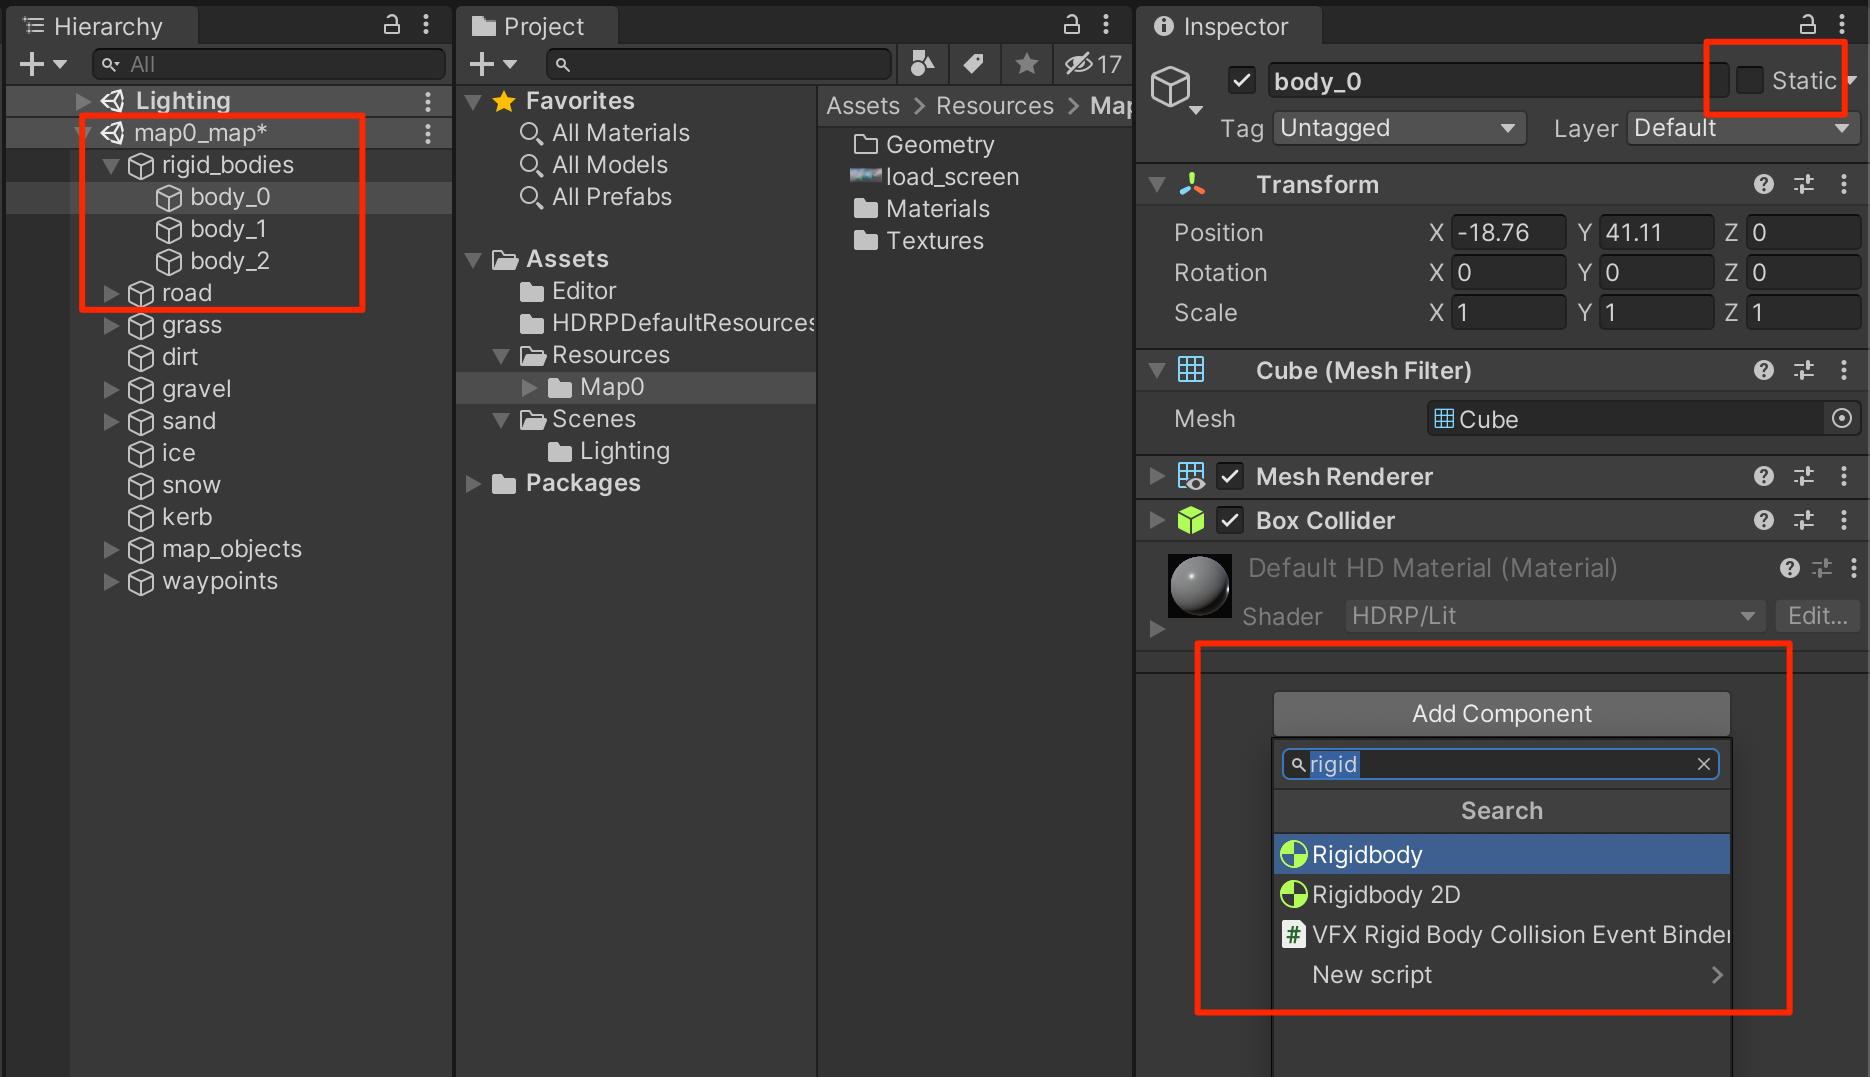
To add a dynamic RigidBody ojbect, create an Empty object called rigid_bodies in the scene's hierarchy.
Add all the dynamic objects inside of it. Also make sure that all the objects inside rigid_bodies DO NOT have a static flag.
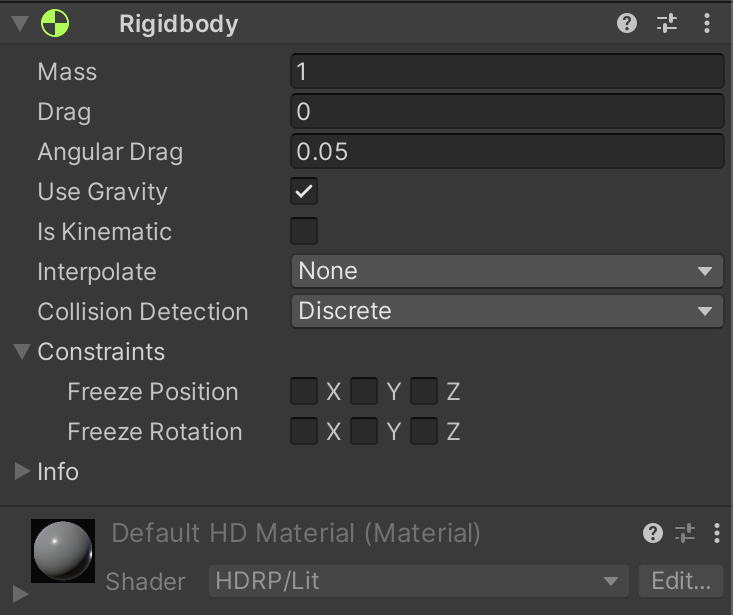
Also you need to add the RigidBody component to all of the objects.
After that you can get to setting up the object's parameters. Play around with the values to get the desired result.
MapTool and building the map asset bundle
To open the tool for map bulding go to Kino -> MapTool.

The window that appears can be dragged to any of the editor's groups.

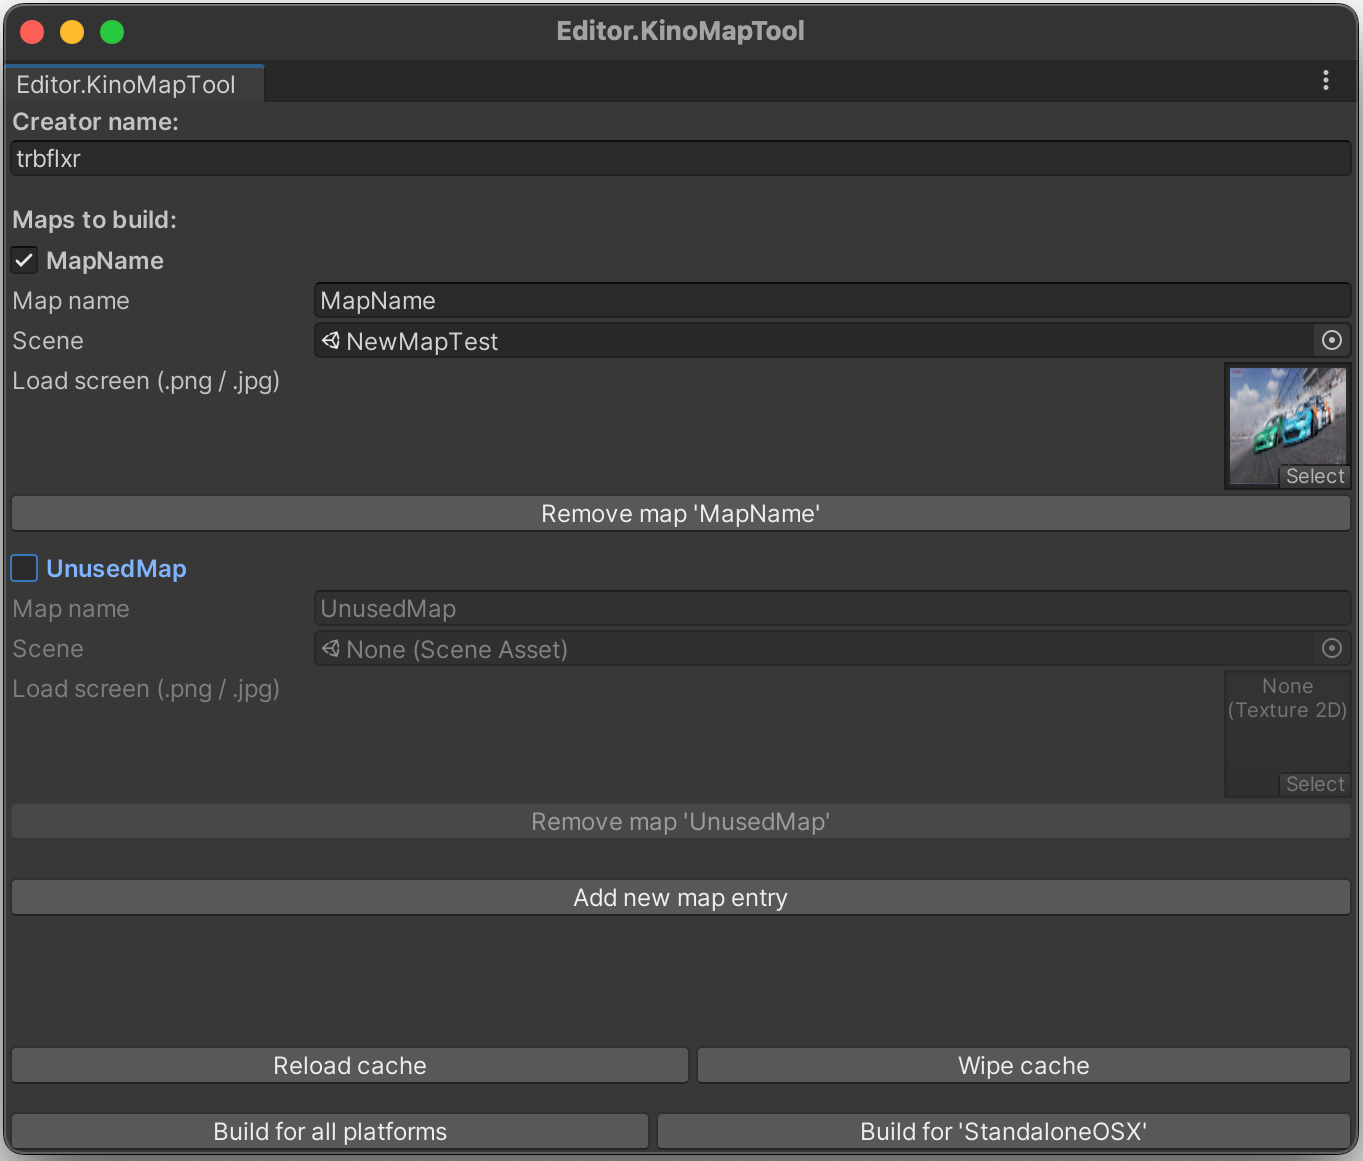
MapTool
The field Creator name is needed for the map creator's name.
Bellow is the list of maps. The maps marked with a checkmark are the maps that will be built. Mark only the map you're working on currently. That way the other maps won't be rebuilt and it will speed up the process.
Bellow you have a button Add new map entry, that allows to add a new map to the list. To remove a map from the list click on Remove '
Then you have Reload cache and Wipe cache buttons, which are needed for reloading and deleting the maps' cache. Maps' cache is stored inside Assets/Build/map_cache.knd and is needed to save the current state of the tool.
Buttons Build for all platforms and Build for '
Building the map
To build the map fill up the Creator name field. Then add a new map to the list if you haven't already.
Mark the map you want to build with check marks and fill up the fields.
State the name of the map in the Map name field.
Drag and drop the map's scene to the Scene field, in the example bellow it is the NewMapTest we created earlier.
Load screen field is intended for the pictures that are going to be used for the loadscreen. Drag and drop the pictures in .png or .jpg formats that you want to use inside the field.
And finally to assemble the map click on Build for all platforms or Build for '
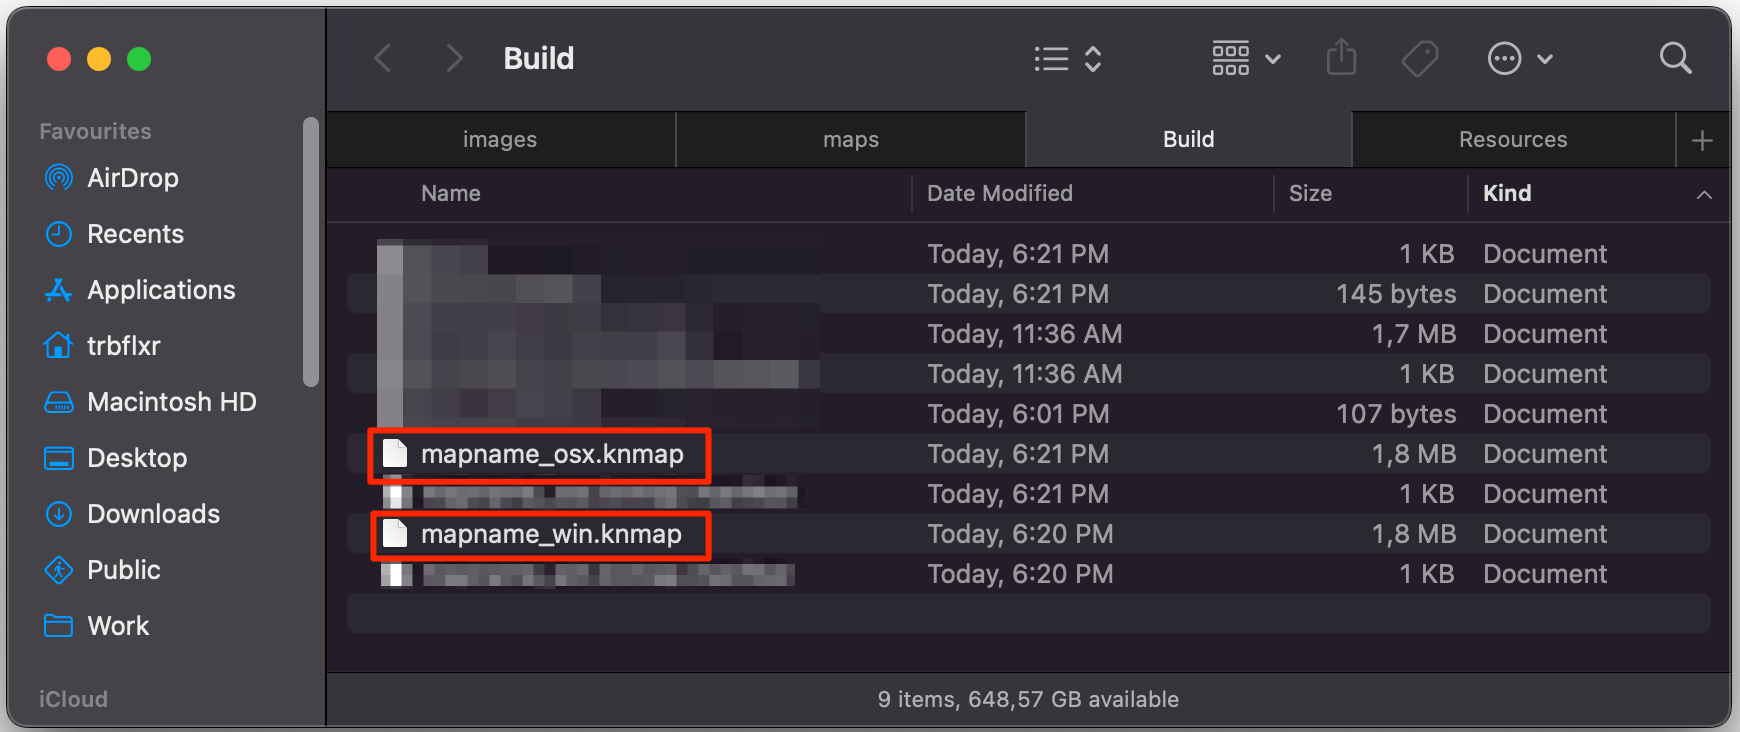
The final result is located inside the Build folder, that you can quickly open from the menu using Kino -> Open maps folder.

As a result you're gonna have maps for the selected platforms. They can be loaded using Kino.